Nubian artifact project

This week in the Imaging Lab, the Yale Peabody Museum is collaborating with the Near Eastern Languages and Civilizations department (NELC) to photograph Nubian artifacts for documentation purposes.  NELC will be using Project Room 3 and the Hasselblad camera on the vacuum copystand to take high resolution photos of the artifacts.  This equipment allows them to get highly detailed images that can be used for publication purposes.  They will also be scanning old documents and maps related to this collection.  Here is a little background on the project:

The Toskha Project

In 2008, the Yale Peabody Museum of Natural History in collaboration with the Yale Egyptological Institute in Egypt (NELC department) began a re-examination of the material from Nubian cemeteries of the so-called Simpson Collection.

In 1962, as part of the UNESCO Nubian salvage campaign, the Pennsylvania-Yale Expedition to Egypt excavated several archaeological sites in the area of Toshka. This expedition, directed by William K. Simpson professor of Egyptology, was a component of a larger campaign carried out between 1961 and 1963 that examined the region of Toshka and Arminna in Lower Nubia. Nubia is a region along the Nile river located in southern Egypt and northern Sudan.  Several monographs resulted from this work, however, much of the archaeological material—particularly the Nubian Bronze Age cemeteries—remains unpublished.

The imaging project aims to produce a monograph with a systematic catalogue of graves and funerary offerings from Toshka West (TW) Cemeteries B, C, and D, the site of Gebel Agg at Toshka East (TE), and miscellaneous sites.

General information on burial ground and graves, including a sketch of shaft and inhumation, has been obtained from the original field notes, now housed at the West Campus Peabody Anthropology unit as part of the Simpson Archive. There are maps, photos and a few drawings from the original archive. The new high resolution photos of pottery vessels and jewelry, once part of the funerary offerings, are being taken to improve the quality of the documentation.

West Campus Peabody Anthropology unit:  Roger Colten, Maureen White and Rebekah DeAngelo

Egyptology:  Maria Gatto, Colleen Manassa and Alberto Urcia

Alberto Urcia is the digital surveying and virtual archaeology expert of the Yale Egyptological Institute and the person in charge of photographing the objects.

Nubian artifacts from the Anthropology division of the Yale Peabody Museum waiting to be photographed.

Alberto Urcia, Associate Research Scientist for Yale Egyptological Institute, manually adjusts the camera to make sure that certain areas of the artifact are in focus.

In an effort to remove shadows from the photograph, Alberto lights the artifact with an additional light source.

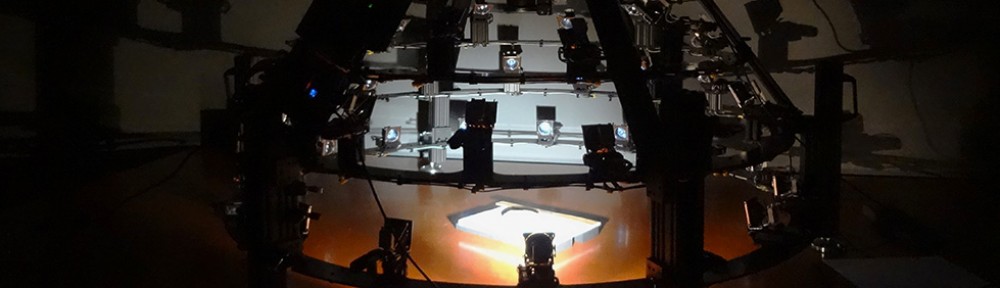
While normally used to shoot straight down, the camera on the vacuum copystand has been rotated 45 degrees to photograph the sides of all of the artifacts.

Alberto checks the clarity of the high resolution photograph. High resolution photographs allow researchers to view scratches, cracks and traces of paint at a high magnification.


Have 3D scanner, will travel!

We have another exciting project this week!  We packed up the ShapeGrabber 3D scanner in the YDC2 Imaging Lab and set up shop temporarily at the Yale Center for British Art where Ruggero Pintus and Ying Yang, Postdoctoral Fellows for the Computer Science department, performed 3D scans of a marble bust of the esteemed poet Alexander Pope.

3D laser scanners are best for capturing surface topography.  The scanner passes a laser beam over an objects surface rapidly to take measurements from many location points on the object.  The resulting dense grid of 3D points is called a ‘point cloud’.  This ‘point cloud’ requires post processing to convert it into a useable format.   An accurate 3D reconstruction can help authenticate works of art and can be a valuable tool for conservators.

The Yale Center for British Art (YCBA) and Waddesdon Manor (the Rothschild Foundation and the National Trust) are co-organizing a major exhibition on the sculptural images of Alexander Pope, which will open at the YCBA in spring 2014 and at Waddesdon Manor in summer 2014.  The focus of the exhibition will be the series of busts of Pope made by the French émigré sculptor Louis Francois Roubiliac. The exhibition will assemble the signed and documented versions of Roubiliac’s busts of Pope, which span the years from 1738 to 1760, as well as a number of the adaptations and copies that were modeled after them.

By performing 3D scans of all of the busts, the YCBA’s aim is to explore not only the complex relationship between these various versions but also to shed new light on the hitherto little understood processes of sculptural production and replication in eighteenth-century Britain. The project offers a unique opportunity to study the objects side by side, both visually and technically, revealing similarities and differences in handling, surfaces, dimensions, construction, and materials.

The ShapeGrabber packed and all ready to go to the Yale Center for British Art to begin scanning!

Ruggero Pintus rotates the bust of Alexander Pope a few degrees so that the camera can acquire a new scan.

The scanner is placed level with the bust to get straight on scans of the bust.

Close up of the laser sweeping over the bust as it completes a scan.

Ying Yang checks to make sure the new angle of the laser is capturing the data from the underside of the bust. By lowering the scanner and angling the laser up, scans of the underside of the shoulders, chin, nose and ears of the bust can all be captured. The data in these scans will then be aligned with the data from the scans taken with the camera level with the bust.

Ruggero looks on as the laser acquires data from scans of the top of the bust. By moving the scanner to a higher position, the laser is now able to scan the top of the shoulders and the head of the bust. The scans of these areas will be added to the scans from the other two positions and will be compiled into a digital 3D rendering of the Pope bust.

Ying and Ruggero align and combine all of the scans to produce a 3D image of the bust.

Indo-Pacific Textile project

The first project in the Imaging Lab is in full swing!   Indo-Pacific textiles from the Yale University Art Gallery (YUAG) are being photographed in Studio 2 with a camera mounted on the catwalk. This is unique because it is the first time we have had a studio this large to photography items from this height.  The catwalk allows photographers to mount cameras anywhere between 15 feet and 17 feet in the air which allows them to cover a larger area when spreading items out on the floor.  Here is a little background information on the project:

Established in 2009, the Department of Indo-Pacific Art oversees the newest collection at the Yale University Art Gallery and has three areas of strength: ethnographic sculpture, ancient Javanese gold, and Indonesian textiles.

The textile collection holds about 600 textiles from Indonesia, mainly collected by Robert Holmgren and Anita Spertus. This group is of exceptional quality and ranks among the finest in any museum. The collection includes particularly superb textiles from South Sumatra, Sulawesi, and Borneo, and it includes rare and unique weavings that reflect the history of Indonesian designs.

The Indo-Pacific textiles were selected to be photographed in their entirety as part of the annual project photography to meet an increasing demand from scholars and the curator for good-quality images. YUAG plans to publish a book on the collection.

Coordinated by the Visual Resources department at YUAG, contract photographer Chris Gardner and a team of 6 Gallery staff are photographing the collection in high-resolution digital format over a seven week period. Once photographed the images will be stored in the YDC2 Content Management Platform  and made publically available on the YUAG’s website and through Discover Yale Digital Content. Most all of the objects photographed will also be available for download from the YUAG website as either PowerPoint sized JPEGs or 20MB Tiff files.

Chris Gardner, contract photographer for the Indo-Pacific textile project, makes adjustments to the camera mounted to the catwalk so that he can accurately photograph the textiles laid out on the floor below.

Ben Diebold and Jac Parker from YUAG carefully unwrap the Indo-Pacific textiles and make sure the correct barcodes are associated with the correct textiles before they get photographed.

Jac Parker, from YUAG, carefully unrolls an Indo-Pacific textile onto vinyl dance floor material while removing the acid free tissue paper that was placed between the layers of the fabric.

Chris Gardner and Ben Diebold move the textile into place so that it will be in the right position under the camera to be photographed.

Chris Gardner and Susan Kiss photograph an Indo-Pacific textile using a camera mounted to the catwalk 17 feet in the air.

Chris Gardner and Susan Kiss carefully place the Indo-Pacific textile on the acid free tissue paper so that it can then be rolled up onto the acid free tube for storage. By rolling the textiles, instead of folding them, the textiles remain crease-free.

Some of the textiles are large and need two people to unroll them. Ben Diebold and Elizabeth Solak position the textile so that it will unroll directly under the camera that is mounted to the catwalk above.

Once the textile is laid out, any foreign fibers need to be removed before the textile is photographed. Here, Elizabeth Solak removes these unwanted fibers with a pair of tweezers. Ben Diebold makes sure that the textile lies flat for the shot.

With the help of two art handlers, Ruth Barnes, Curator of Indo-Pacific Art, lays out an exceptionally long textile in a snake-like pattern in preparation for a photo.

Grand Opening!

On April 4th, we celebrated the opening of the Yale Digital Collections Center Imaging Lab and the Research Labs of the Center for Conservation and Preservation. We gave tours of the Labs and, in the Imaging Lab, had demonstrations of our 3D scanners, robotics book scanners and vacuum copy stand.  We also showed off our color proofing areas, cove wall, easel and our large catwalk!  With approximately 200 visitors, the opening was a huge success!  Now that we are open, we are ready to scan, photograph and image cultural heritage objects.  Lights! Cameras at the ready!  Shoot!


There was a bustling crowd of approximately 200 at the ribbon cutting ceremony excited to get a tour of the new Imaging Lab!

Scott Strobel, Vice President of West Campus and of Planning and Program Development (middle), cuts the ribbon celebrating the opening of the YDC2 Imaging Lab and the Research Labs for the Center for Conservation and Preservation (CCAP) with Meg Bellinger, Director of YDC2, and Ian McClure, Director of CCAP.

Meg Bellinger gives an introduction and background on the Imaging Lab to the first crowd before the tours and demonstrations start.

John ffrench, Director of Visual Resources at the Yale University Art Gallery as well as a member of the Imaging Lab working group, explains the significance of the large studio space and the function of the easel, catwalk and cove wall.

Holly Rushmeier (left), Professor and Chair of Computer Science, demonstrates 3D imaging of cultural heritage objects using the ShapeGrabber 3D scanner with the help of Ruggero Pintus (far left), her Postdoctoral fellow.

NextEngine 3D scanner in the process of scanning an object while rendering the image on the computer screen. As the object is turned and scanned from all angles, the images will be combined to form a 3D image of the object on the computer.

Larry Gall, Head of the Computer Systems Office at the Yale Peabody Museum and a member of the Imaging Lab working group, demonstrates the Kirtas robotic book scanners to the crowd. Photos are taken of the left and right page of the book. A vacuum robotic arm then turns the page and the next set of photos are taken. At the highest speed, a 300 page book can be photographed in 8 minutes. After the photos are checked for quality by the user, they are turned into a PDF.

Richard Caspole (middle), a photographer at the Yale Center for British Arts, demonstrates the vacuum copystand and the importance of obtaining accurate color when photographing.

Melissa Fournier, Associate Registrar for the Yale Center for British Arts and a member of the Imaging Lab working group (back center), shows off our color proofing room, complete with black out curtain and explains why color proofing is important.

After the tours were over, there was a lovely reception with a glass of bubbly for everyone to celebrate all of their hard work.

A very special thanks to the collaborative efforts of the Imaging Lab working group for their hard work and dedication, without which this lab would not be possible.

We have reached the finish line!

The final coats of paint on the walls have been completed.  The floors in Studio 1 and 2 are finished.  The Yale Digital Collections Center Imaging Lab is now complete!  Now that the paintbrushes, hammers and nails have all been put away, we can stand back and admire how far we have come in the seven months since this renovation began.  Special thanks to all of the workers who made this space possible.

On the left, you can see the original space before renovation. On the right, you can see the finished 3D and scientific imaging room. This room has equipment capable of taking 3D and multispectral images of cultural heritage objects.

On the left, you can see the original space before renovation. On the right, you can see Studio 3 complete with sound dampening audio panels on the wall. These robotic bookscanning machines are used to photograph books at a very fast rate and then turn them into digital copies. 

On the left, you can see the original space before the renovation. On the right, you can see Project Room 3 completed. This vacuum copystand will be able to accommodate prints, maps, posters, etc up to 40″ x 60″ to photograph.

On the left is the area before renovation. On the right is the completed Project Room 4. It can be used as a color proofing area or double as a small studio area. The large door at the far end allows large objects to be moved from the loading dock into the studio to be photographed.

On the left, you can see the original warehouse space before renovation. On the right you can see Studio 2, complete with a brand new catwalk to photograph objects from above.

On the left, you can see the original warehouse space before renovation. On the right, you can see the completed cove wall in Studio 1 ready for photographic projects.

Let there be light!!!

We are entering the final weeks of construction and the lab is coming together beautifully!  The team has been working hard on all fronts.  The electricians have installed miles and miles of data wire as well as our new light fixtures!  The painters have finished painting the ceilings, walls, and the catwalk and ladder.  We now have new doors, ceiling grids and sound panels! The cove wall has been installed and has been taped.   Every day there is something new!

Electricians hang the much anticipated light fixtures for Studio 3 in the Imaging Lab. All of the light fixtures in the Imaging lab will be equipped with bulbs that maintain a true color quality and even light illumination.

Electricians bundle the 85,000 feet of data wire that run through the Imaging Lab. That’s 16 miles of cable!!!!!!

An electrician installs the transformers that will provide the electricity for the whole Imaging Lab.

The new light and cabinet was installed in the back of Project room 4 which will be used as a color proofing area.

Studio 3 ceiling was painted with a matte black paint called Dry Fall. The paint is sprayed onto the ceiling wet. Any drops of paint that don’t adhere, will fall towards the floor and dry into a dust by the time it hits the floor, thus becoming easy to sweep up.

The catwalk and ladder get a final coat of paint.

Steve Saunders, Project Superintendent, shows off the new front doors of the Imaging Lab.

Ceiling grids were installed in Project room 2 as well as all of the office areas.

Sound panels were installed in Studio 3. These panels will lessen the noise created from three bookscanning machines that will soon occupy this studio.

Once the cove wall was fully installed, all the seams needed to be taped and sealed – this included the seams behind the wall.

In order to attach the cove wall to the floor, two of the painters had to wiggle between the cove and the south wall of Studio 1.


Open Sesame!

This week was marked by the delivery of our 10 foot rollup doors!  These doors will provide access for large objects to enter the studio spaces.  In other news, the catwalk had its mesh sides installed.  The partition beam and motor were encased in sheetrock.  A few of the project rooms have gotten a fresh coat of paint.  All of the sprinkler heads in the Imaging Lab were replaced.  Ductwork and electrical continue at a steady pace.

The new rollup door between the hallway and the warehouse space has been installed. I got to try the manual release!

Carpenters on a scissor lift are installing sheetrock that will encase the steel beams which will support the partition wall between Studios 1 and 2.

In the foreground, the catwalk stands proudly with its new mesh sides. A taper stands on a scissor lift and tapes the sheetrock around the partition track. In the background, a tinknocker installs ductwork in Studio 1.

George and Steve discuss the insulation which will prevent condensation from the ducts.

Sprinkler heads get replaced with new ones.

Steve Saunders, Project Superintendent, tests the tensile strength of the easel peg holes.

Studio 3 gets a coat of grey paint.

Just hanging around…

This week the team has been hanging a variety of items around the Imaging Lab.  In anticipation of receiving our light fixtures, the electricians have hung the support chains from the ceiling in Studio 3.  The track for the partition wall has arrived and is currently being installed.  One opening for the last door installation has been raised in height to accommodate the new coiling doors. Duct work continues at a steady pace.

Chains hang from the ceiling of Studio 3 demonstrating where the light fixtures will be mounted.

The upper track of the partition wall has been attached to the recently installed steel beam. This track will allow the partition wall to open and close smoothly between Studio 1 and Studio 2.

Two carpenters frame the doorway that will lead from Studio 1 and Project Room 4 to the loading dock. The doorway was raised to 10 feet to accommodate the new coiling doors that will be installed in the Imaging Lab.

New ducts awaiting installation in Studio 2.

Moving along purrfectly…

The team has been very busy in the last few weeks.  Most of the walls have been closed with sheetrock.  They have been taped and sanded and will soon be ready to be painted.  Installation of the plywood backing of the cove wall in Studio 1 has completed.  However, the big excitement was the delivery and installation of the catwalk for Studio 2!

The bottom half of the west wall of Studio 2 has been taped and sanded. This is the wall where the easel will be located.

Walls in Studio 1 and 2 have been taped and sanded and are ready for painting.

The cove wall has been sheetrocked and the plywood has been installed. It is ready for the installation of the fiberglass cove pieces.

Iron workers unload pieces of the catwalk from the delivery truck on a very cold November morning. These pieces will be bolted and welded together from the ceiling in Studio 2 in the Imaging Lab.

Steel hoops are bolted to the ceiling and act as supports for the catwalk that will hang over Studio 2 in the Imaging Lab.

Iron workers place the steel supports for the base of the catwalk.

Iron workers place the final pieces of steel on the frame hoops for the catwalk.

Sometimes adjustments need to be made in the field. Here an iron worker is smoothing down the welds on the steel supports of the catwalk.

The catwalk frame has been hung along with half of the galvanized steel grating that will be used as the floor of the catwalk.

Iron workers use a chainfall to slowly raise the ladder into an upright position so that they can place it against the wall to weld it into place by the catwalk.

TADA! The ladder is in place!

The Coordination Group received a tour of the Imaging Lab including the newly installed catwalk in Studio 2. The Coordination Group has been instrumental in determining the layout of the Imaging Lab as well as space and equipment needs.

Beam me up!

The Imaging Lab was a flurry of activity this week.  The “big” news was the delivery of three 1300 pound steel ‘T’ beams that will be used as support for the partition wall between Studios 1 and 2.  We also received our door frames and they are being installed as I write this.  Insulation has been placed in east wall of Studio 1. Installation of plywood backing of the cove wall in Studio 1 has begun.  Electrical and duct work continue to progress.

Two iron workers raise the first 1300 pound steel beam into place where it will get welded to the existing beams in the ceiling. These new beams will add strength and stability to the new partition wall that is being added to the Imaging Lab. The folding partition wall will separate Studio 1 from Studio 2 but can be opened to create one large studio space.

The second of three 1300 pound steel beams is moved into place.

Iron workers slowly raise the last 1300 pound steel beam into place to weld it.

The third 1300 pound steel beam is carefully being put in place around an existing water pipe.

Carpenters are installing the metal double door frame between Studio 2 and the office area space.

Insulation has been placed inside the frame of the east wall of Studio 1.

Carpenters are up in a scissor lift installing fire retardant plywood in the area of the cove wall. They will install the plywood 19′ high- the total height of the cove.

Mark placed on the plywood stating that it has been safeguarded as fire retardant treated wood.