We rocked while Hurricane Sandy rolled!

While Hurricane Sandy hit the area hard on Monday and Tuesday, the job site was open and work continued on the Imaging Lab.  Durock was removed in Studio 1.  Plywood and sheetrock were installed on the easel wall in Studio 2.  Plywood blocking was put in place in preparation for the mounted arms that will hold display screens.  Floor leveling compound was poured to level out the uneven floors in Studio 3 and Project room 4.

The durock layer in Studio 1 has been removed so that the plane of the wall is even. The cove wall can now be installed and the wall will be given a new layer of sheetrock.

This is a closeup of the layers of durock. Durock, also known as cement board, is a mixture of crushed stone/gravel and Portland cement (the most common cement) poured between 2 pieces of polymer coated fiberglass mesh. It is very similar to sheetrock but is heavier due to the fact that it has cement in the middle instead of gypsum.

All of the previous doors and windows in the hallway that lead to the rooms that would be the Imaging Lab were sealed with sheetrock and taped.

The west wall of Studio 2 has two different planes. The top have of the wall was indented about an inch so strips of plywood were screwed to the wall to make the wall the same thickness as the lower half. The entire wall was then covered with plywood. This plywood will eventually be covered with sheetrock. In the future, large paintings will be hung from this wall and photographed. The plywood will help anchor the screws that will hold up the paintings.

Now that the easel wall in Studio 2 is covered in plywood, it gets a layer of sheetrock that will be painted white which will be used as a background when photographing objects on the easel.

Plywood blocking is used in the wall where a display screen is going to be placed in the central office area. This will allow the arm that will hold the display screen to be mounted to the wall.

Floor leveling compound has been poured over the quartz epoxy to level out the floor in Studio 3.

I see your duct and raise you a doorway

This week one doorway to the loading dock has been raised to 10 feet high, the same height as the doors to the Imaging Lab to accommodate the movement of large objects.  Insulation was installed on the newly erected ductwork.  Installation of copper heating pipes and ductwork continues.

This area of the hallway has been raised to 10 feet to accommodate large objects that will be transferred from the loading dock to the Imaging Lab for digitization.

Insulation has been added over the ductwork to keep air heated in the winter time and to reduce condensation from cool air in the summer time.

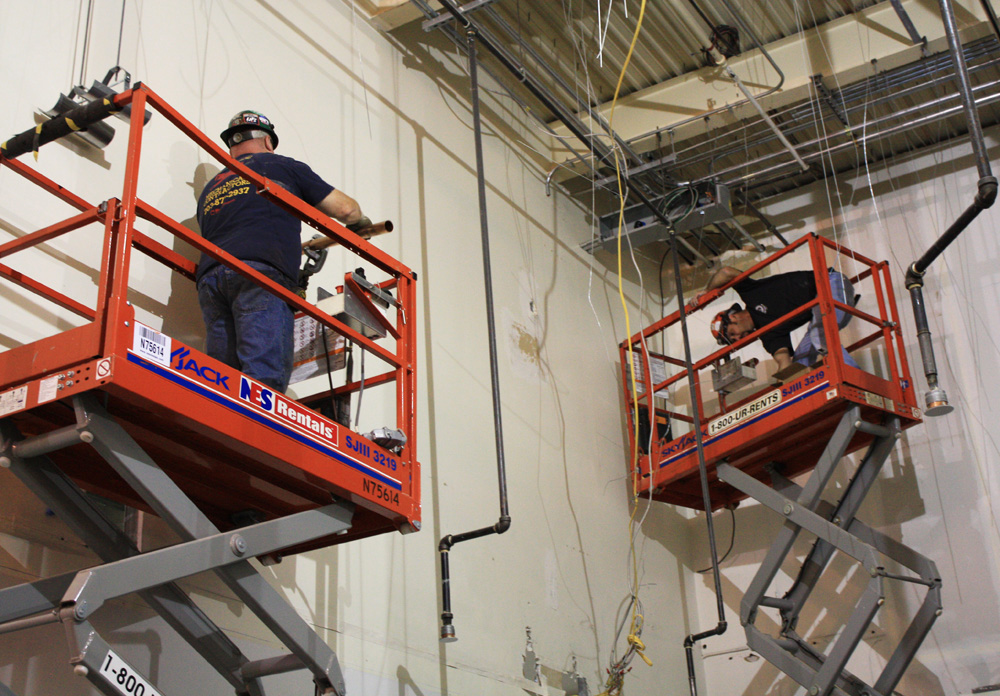
A pipefitter solders copper heating pipe together over the office area of the Imaging Lab.

Ductwork connection being placed in the wall between Studio 3 and the office area.

Pipes, conduits, ducts — Oh My!

Things are moving forward this week in the Imaging Lab.  Copper heating pipes were installed through the office space.  New conduit has been installed that will hold the data and electrical lines for all of the Imaging Lab. Installation of ductwork continues.

Here are some photos of the progress!

These newly installed copper pipes will not only heat the Imaging Lab but they will reheat the air to reduce humidity.

Ductwork connection over the office space in the Imaging Lab.

On the left, a pipefitter is installing copper pipe between Studio 3 and the office area of the Imaging Lab. On the right, an electrician is trying to set up the electrical wires for Studio 3 on a scissor lift 20 feet in the air.

New conduit that will soon hold data and electrical lines was attached to the ceiling in Studio 1 and Studio 2.

Sheet rock being installed on the wall between Studio 2 and Studio 3.


Steve Saunders, Job Site Supervisor, and Meg Bellinger, Director of YDC2, on a tour of the Imaging Lab.

We’ve been framed!

Construction of the YDC2 Imaging Lab is fully underway and this week the team completed the framing of several project rooms.  This also has allowed the electricians to start laying the conduit that will hold the wiring for the Imaging Lab.

Here are some shots of the progress we’ve made.

The doorway for the main entrance to the Imaging Lab has been framed out!

The carpenters are framing the walls in the office area and raising them to 9 feet.

The walls for the 3D Imaging room have been framed out!

The walls for the Scientific Imaging room have been framed out!

Now that the walls are framed, the electricians are now able to put in the conduit that will hold the electrical wires that will supply power to the Imaging Lab.


Construction of the West Campus Imaging Lab is underway

Construction of the YDC2 at West Campus Imaging Lab started Tuesday September 4th.  The University is converting the former pharmaceutical manufacturing plant and warehouse into a state-of-the-art collections study facility that includes new cutting-edge equipment and collaborative workspaces designed for innovative imaging projects. The renovation, funded in combination by the University and the generous gift from Lisbet Rausing and Peter Baldwin, is strategically designed to make use of existing laboratory and office spaces and will be completed over a two year process.  This year’s renovations include improving the physical spaces to be utilized by the YDC2 Imaging Lab and the renovation for the Center for Conservation and Preservation.

The news story announcing the construction kickoff was published about a month ago. Now construction is fully underway and the team has been working to complete the project by early 2013.

The emphasis so far has been on demolition. This week, some of the electrical is being laid in Studio 2. The team is also framing the new walls and the duct work in the Office area.

The view from Studio 2 into the Office area


The view from the main entryway of the YDC2 Imaging Lab as of today. You can see all the way to the back of Studio 2.


View of the carpenters erecting the wall between Studio 2 and Studio 3.


These air handlers are attached to the air handlers on the roof to provide negative air to the space. Air naturally moves from areas of higher pressure to areas of lower pressure. When negative pressure exists, this prevents airborne particles generated in the construction area from escaping into the corridor.