Yale will be soon upgrading PROD to version 2.2.0. This is quite exciting as this is the foundation for our migration from YFAD to the Public User Interface. It also has some updates on commonly used features. I wanted to talk about one in particular—Reorder Mode. If you want to get a head start on learning how this feature works in version 2.2.0, you can try it out in our TEST instance of ArchivesSpace, which has already been upgraded.
Currently in PROD and in older versions of ArchivesSpace, if one needs to reorder their resource record, it was done using drag-and-drop techniques in the tree. One clicked and held the record and dragged it to where they wanted it in the tree. If it’s at the same level as where it previously was, just in a different place, you would hold it between the ‘sibling’ components where you wanted it; if it’s supposed to be a child of a currently sibling component, you can drop it ‘on top’ of the sibling component. A small arrow would should where it was placed in the hierarchy, and a green check box would appear if ArchivesSpace recognized it as a legal move. Let’s look at some screenshots to make that word soup clearer.
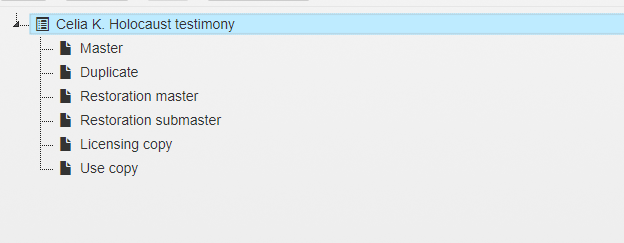
Here is a snippet from HVT-0036’s tree, which is in its original order, from PROD.
Here’s me moving the Restoration submaster component to become the sibling between Duplicate and Restoration master. Note the small black arrow between the Duplicate and Restoration master components showing where I’m placing it and the green checkmark by the floating Restoration submaster component (Ghost component?)

And we have the sibling in place!

Now I’m moving the Restoration submaster component to become a child of the Restoration master. I have moved it so it’s on top on the Restoration master—you can see the black arrow resting on the same line of the Restoration master in the tree. Green checkmark of the ghost component shows we’re ready to go.

And we now have a child. Please note that if there were other children of the Restoration master component, it would have ended up on the top of the list if that branch of the tree was not open. If the tree was open so you could see the children, you would be able to drag between its soon-to-be siblings.
While this is not unintuitive, it also sets up users for errors. One can accidentally reorder things without trying to since the tree is always open and the ability to reorder is always ‘on.’ The precision of the dragging and dropping is also not always easy to handle. It’s not uncommon when moving a component elsewhere on the same hierarchical level to accidentally make it a child of a would-be sibling, and vice versa.
Therefore, ArchivesSpace has a new feature- Reorder Mode.
Let’s take a look at HVT-0036, this time in TEST.
The tree looks bigger and has larger markings to denote the ‘line’ of the component. Also, there is a new button, which I outlined in red, titled “Enable Reorder Mode.” If I try to move anything without that button being clicked, nothing’s going to happen with the tree, except maybe opening the component below the tree to edit. So, what do I do to move my Restoration submaster?
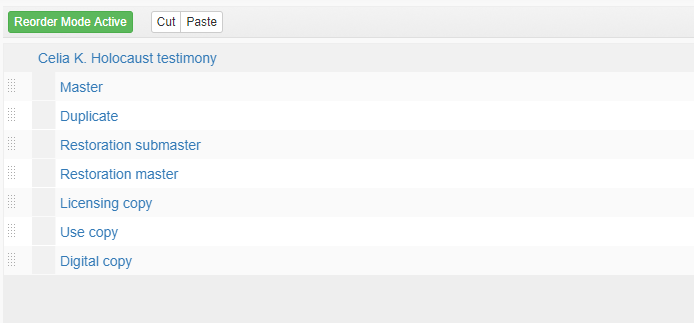
First, I’m clicking on the button. This turns the button green and changes the label to “Reorder Mode Active.” It also shows two new buttons: cut, which I outlined in green, and paste, which I outlined in purple. The record view below also disappears below the tree.

I can simply move the component by hovering the cursor (which has turned into a four-direction symbol) over the appropriate white box with gray dots to the far left of the component, clicking, and dragging and dropping it. After I move the component to where I want to, a new dropdown appears, asking me where exactly I want to put it. Since I want the Restoration submaster to come before the Restoration master, I’m clicking “Add Items Before.”

It’s now where I want it.
You can also move multiple components this way! If you click on the white boxes with the gray dots to the far left of the tree while holding the CTRL key on your keyboard, the boxes will turn blue, and numbers will appear to show the order it will be in when you start dragging the components. (i.e. 1 means the first component in the list, 2 is the second, etc.) This has the bonus possibility of changing the order of a level of an inventory on the fly by changing how you click the components.
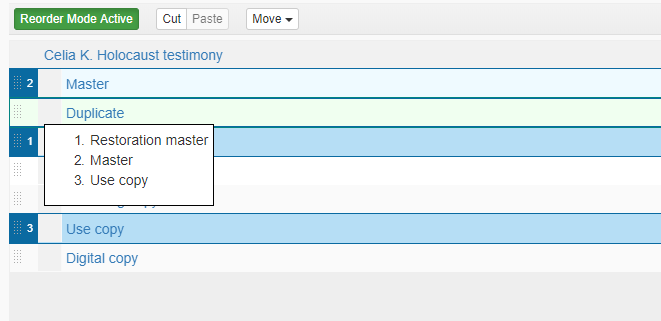
So here I have selected these three components to move. I want the order to be Restoration master, Master, and Use copy.

At this point, I am dragging the components. ArchivesSpace is kind enough to list the order for me so I know how it’s being moved.
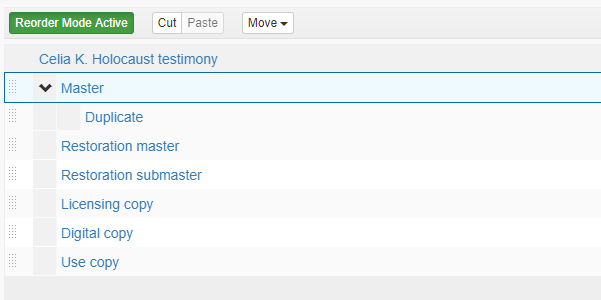
Like with a single component, it will ask me to select whether these components are to be added before a selected component (in this case, Duplicate), after the selected component, or as children of the component. I selected children and they are now children of Duplicate.
 Another way to move a component, if you are concerned about not being able to drag it where you want it due to mouse issues or the like, is to click on the name of the component. ASpace will outline it in blue and a move button, which I outlined in orange, will appear.

Clicking on the Move drop down will show the choice to move the component up, down, or down into, meaning within a component as a child. Hovering the cursor over the down into option will open a new drop down to show you where you could possibly put the component.

Since I want this component to be a child of the Restoration master component, I will select that option. It then moves where I want it to be.

Please note that the move button does not work with moving multiple components. If you want to move several components at the same time, you’ll have to try another method.
A final way to move a component, which can be incredibly handy for extremely long inventories, is using cut and paste. This is best done when you want a component to become a child of another component rather than a sibling elsewhere on the list. There is a workaround to use cut and paste for creating siblings, although it’s not ideal. But I will cover that too.
Let’s say I want to make the Duplicate a child of the Master component. First, I select it so it’s outlined in blue. Then I will click Cut. The Cut button will turn gray and the component bar will turn a darker shade of gray.

Then I select the component that will become the new parent, Master. IMPORTANT: you need to click directly on the link, i.e. on “Master.” Simply clicking on the box will not work! The Master component will turn blue.

Click Paste. It will turn gray and the screen will display a loading wheel. Then the child will appear where you selected it, and the Paste button will gray out.
Cut and paste also works for multiple components—again, you select all the components you need to move while holding the CTRL key before clicking cut and going to the new parent. But what if you have an extremely long inventory and you want to make the component a sibling?
Follow the directions for cutting and pasting. When you paste, however, you want to make this component a child of the component directly above or below where you ultimately want to move the original component.

In this case, I wanted Digital copy to be a sibling between Licensing copy and Master. So now that I made Digital copy a child of Master, I can drag and drop it above Master.
Final note/warning: while it is tempting to just go, “hey, let me use the move function,” using it to tell it to go up a level will move the component to the top of the inventory. This is likely what you don’t want to do.
While this is a bit of a change, it does allow for more reliability of reordering and I hope this tutorial is helpful for you! For those who prefer watching this in action, I will be posting a screencast next week explaining all of these methods.