It may occasionally be part of your job to get inside of the guts of ArchivesSpace so that you can test a new release, diagnose a bug, or generally get a better sense of what’s going on with the system that you rely  on. Also, depending on your organizational structure and the way that resources are distributed, you may need to be in a position to help your local IT department answer questions about what’s happening with ArchivesSpace.
It’s (very smart) common practice to not give access to server environments beyond a small cadre of IT department professionals. And you wouldn’t want to experiment there anyway! Thus, you need a sandbox.
A few folks have asked for instructions about how to create this environment. In short, you’ll be installing ArchivesSpace on your local machines and then hooking it up to a copy of your production MySQL database. I’m assuming that your organization uses MySQL behind ArchivesSpace because most do. There’s really great documentation about all of this on the ArchivesSpace github page, but it may be overwhelming if you haven’t done this before. By the way, if you’ve ever managed a database before, you really don’t need this tutorial.
I’ll also talk through configuration, regular updates to the database from your production database, and things to think about when testing.
Congratulations! You’re about to create a consequence-free environment. This means that you should feel free to mess around, take risks, and learn by breaking things. You’re going to break things.
Make friends with your systems administrator
Your sysadmin is whoever is responsible for upgrades, troubleshooting, etc. Let her know what you’re trying to do. You’re going to need her to zip up a copy of the ArchivesSpace application as it is currently and send it to you, and you’ll also either need read access to your production database or a copy of it (better to get read access, if she’s feeling accommodating — you may want to do more with this later). And, if you’re not currently an administrative user of ArchivesSpace, you’ll need to work out a way to get you administrative access. This can be done by having the person who manages permissions temporarily make you an admin user before copying the database and then switching you back.
Here’s what this email could look like:
Dear [awesome work colleague],
I’ve been thinking that it might be helpful if I became more familiar with ArchivesSpace so that I can test new releases before we upgrade, confirm bug reports, and generally get a better understanding of how it all works. I was thinking that I would install a copy of what we use in production onto my local machine so I can learn in an environment that doesn’t impact anything else.
Would you be willing to zip up a copy of our production instance of ArchivesSpace and send it to me [via whatever secure file transfer service you normally use — Google Drive totally works]. I’ll also need access to the production database. Would you be willing to create a read-only account for the production database so I can make periodic copies myself? If not, could you send me a mysqldump?
I’m hoping to get this rolling by [generous and reasonable deadline]. I definitely appreciate the help, and please let me know if there’s any information that you need from me to help fulfill this request.
Your system administrator may be able to jump in and help you get this all set up, or may be super swamped and unable to help at first. It’s important to remember, though, that the goal is to have more people in your organization who can answer questions, and that ideally this will be a net gain for everyone.
Get the tools you need to interact with your database
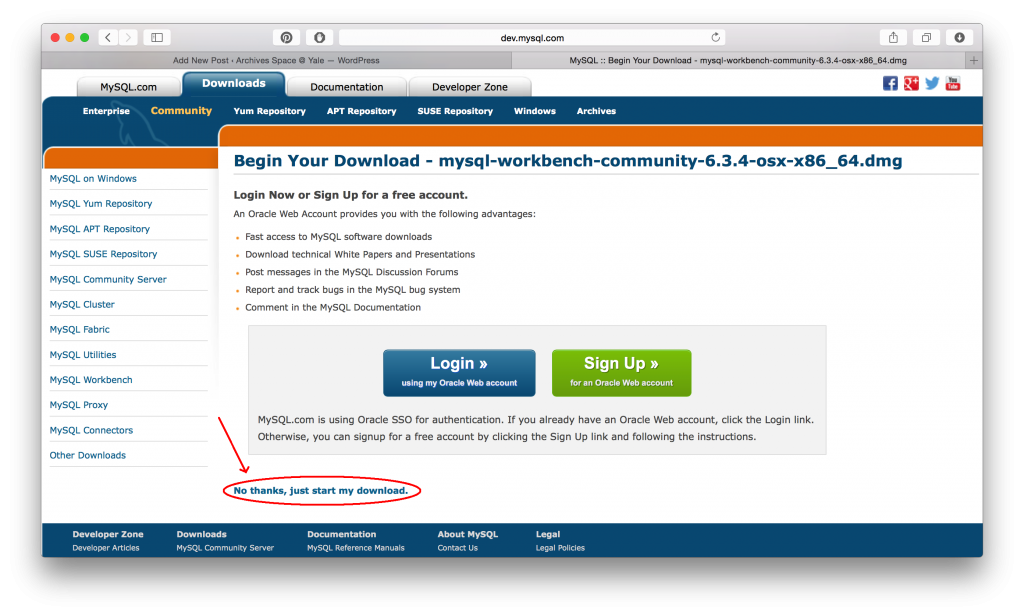
Download MySQL Workbench. It’s going to try to make you sign up for an account, but don’t! (unless you want to). This application lets you explore your database.

Unzip and install.
Get the tools you need to run MySQL
Next, install MySQL community server. This application lets you run a MySQL database on your computer. If you’re a Mac user, there’s an easy one-line installer documented here. It’s what I used, but I’m honestly not in any position to evaluate the merits of using this package as opposed to any other. It will ask you if you want to install Sequel Pro (which does pretty much the same thing as MySQL workbench) — I said no.
If you’re a Windows user (or if you’re a Mac user who doesn’t want to use the installer above), the download link is here. Again, unzip and install.
Load a copy of your production database
Next, you’re going to pull down a local copy of your production database if your sysadmin gave you credentials to do so. In MySQL workbench, connect to your production database.
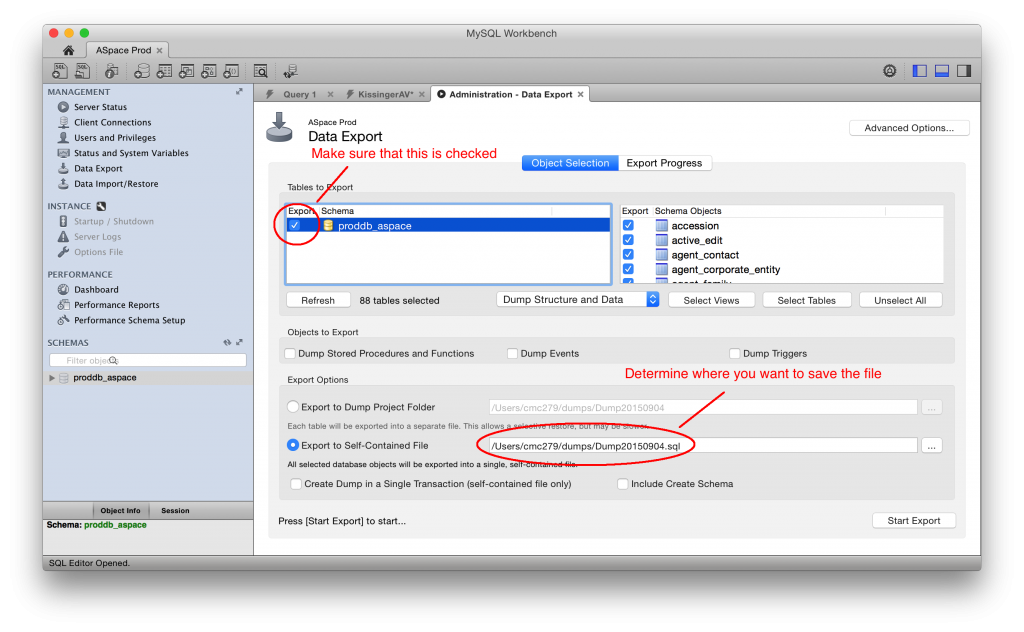
Then, click on the “Data Export” button in the left-hand menu.
You can call the file whatever you want, and it will have a .sql extension.
Take the mysqldump (either made by you in the previous step or by your sysadmin) and load it onto your local mysql server environment.
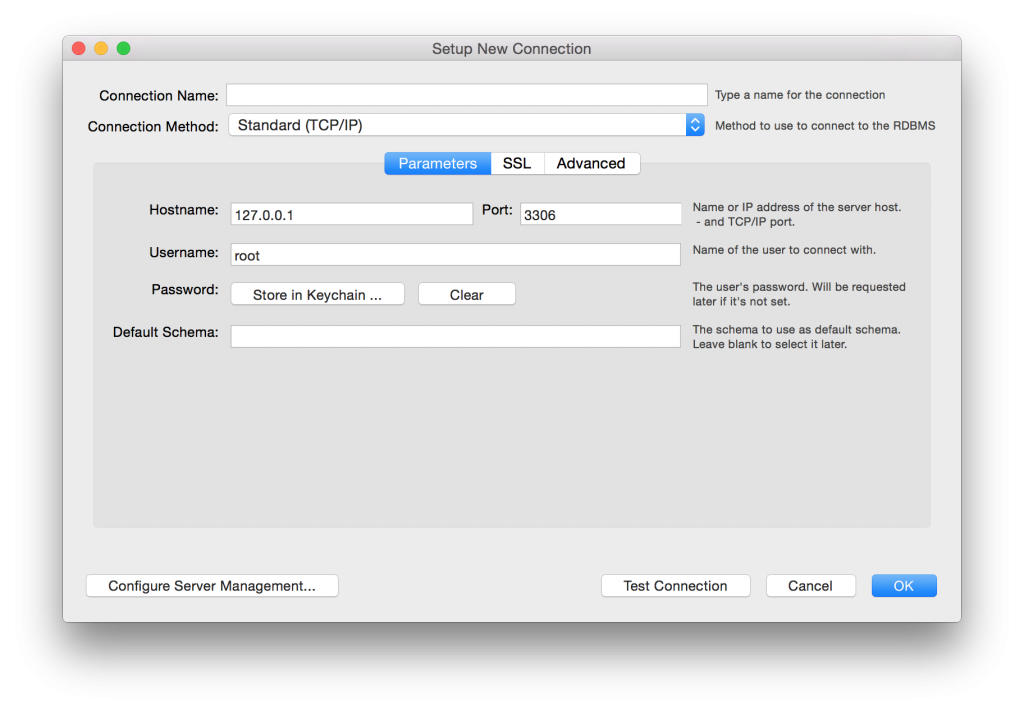
To create your local mysql server environment, click on the + sign next to MySQL Connections in MySQL Workbench to set up a new connection. Then, configure.
 Be sure to give the connection a name — I like “local” — and enter 127.0.0.1 as hostname and 3306 as port. Then, enter the credentials that you had set when you installed MySQL server (if you installed with the one-line install on Mac, the root password was written to a file on your desktop).
Now, connect to localhost. We’re about to put a copy of the production database onto your local machine! Click the button on the top toolbar that looks like a bucket of hazardous waste.
Give your schema a name that clearly identifies what it is (and maybe even that it’s your local copy). The default collation should be utf8 – default collation.
Now, go to File -> Run SQL Script. Select your mysql dump and click open. For default schema name, choose the one you just made. For default character set, choose utf8. Let ‘er run.
Awesome! You now have a copy of your production database running locally. Let’s wire this up to the application.
Setting up the application
Unzip the copy of the ArchivesSpace application that your sysadmin gave you and put it into your applications directory. We’re going to need to update the configuration file to tell ArchivesSpace to look at our local database instead of the production database. You may also need to disable LDAP, if your repository uses it.
Your configuration file is called config.rb and exists in the /config directory in the application. Use your favorite text editor to open this. If you’re on a Windows machine, I recommend notepad++. If you’re on a Mac, I recommend TextWrangler.
In this file, you’re notice that a lot of the lines start with hashes (#). This means that they’re commented out — rendered ineffective. If you want for ArchivesSpace to pay attention to these lines, simply delete the hash.
So, here’s what you need to update. Find the line that starts with AppConfig[:db_url]. Then update it to say the following:
AppConfig[:db_url] = "jdbc:mysql://localhost:3306/Prod?user=as&password=as123&useUnicode=true&characterEncoding=UTF-8"
I have a username to access my local database of “as” and a password of “as123”, but you can change this to “root” and your admin password, or, smarter yet, you can create a user of your choosing.
Check also to see if there’s a line that starts with
AppConfig[:authentication_sources] =
If there is, just add a hash (#) to the beginning to comment it out.
Save your config.rb file and you’re almost ready to go.
Firing it up
Finally, if you’re on a Windows machine, double-click on archivesspace.bat, point your browser to localhost:8080, and you’re good to go. If you’re on a Mac, you’re going to want to open your terminal and (assuming that ArchivesSpace is in your Applications directory) enter
sh /Applications/archivesspace/archivesspace.sh
And again, point your browser to localhost:8080.
Before moving forward
Alright, you have this all set up. It might be worth saving the zipped copy of the application and the database dump before playing around — this way, if you make a catastrophic mistake (and you will), you can just restore from back-up.


Update from 2017-09-25:
Maureen and I spent several hours this weekend (thank you, Maureen!) trying to work through this process to set up a local copy of ASpace on my out-of-the-box-new MacBook Pro, and here are a few notes on changes since she wrote this and additional steps I recommend:
DO NOT ATTEMPT TO USE THE ONE-CLICK INSTALLER FOR MYSQL. It doesn’t work any more, and if you do use it you may end up with a partial install that you have to clean out later. Not sure if this caused some of the problems I was having, but best to just not go there.
Instead, when you get to that step, install Homebrew (https://brew.sh/) and following instructions for using it to install mysql (see https://gist.github.com/nrollr/3f57fc15ded7dddddcc4e82fe137b58e for instructions on how to do the download in homebrew, as well as how to set your root user/password)
Next, create the user you’ll want to use to connect to MySQL and be sure to grant that user all privileges (https://dev.mysql.com/doc/refman/5.7/en/adding-users.html). When you edit the config file later, this is the user and password you’ll want to use.
BEFORE you go to the steps about “Firing it up,” visit the ASpace documentation pages about working with SQL. Follow the instructions about downloading the connector and setting up your database. Make sure that you have put the connector’s .jar file in the archivesspace/lib folder, and not just the folder containing the .jar file, which is what you might get from the download.
NOW you should be ready to Fire it up. You should be able to go to localhost:8080 in your browser and see what you’re expecting to see at this point, though if you look at your Terminal, it will be working hard for a while doing the indexing that allows the search to work.
Fingers crossed!