We have reached the finish line!

The final coats of paint on the walls have been completed.  The floors in Studio 1 and 2 are finished.  The Yale Digital Collections Center Imaging Lab is now complete!  Now that the paintbrushes, hammers and nails have all been put away, we can stand back and admire how far we have come in the seven months since this renovation began.  Special thanks to all of the workers who made this space possible.

On the left, you can see the original space before renovation. On the right, you can see the finished 3D and scientific imaging room. This room has equipment capable of taking 3D and multispectral images of cultural heritage objects.

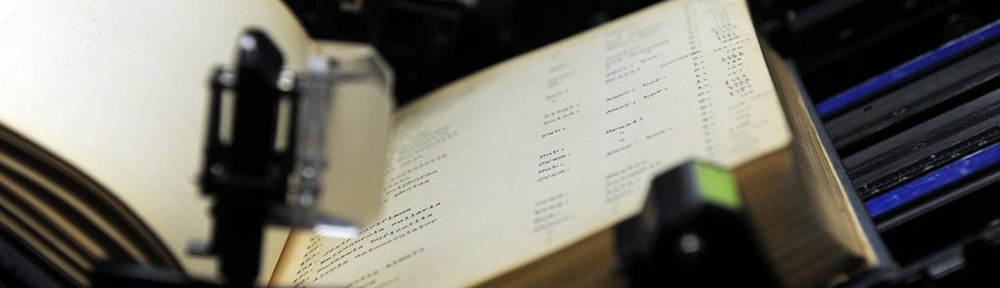
On the left, you can see the original space before renovation. On the right, you can see Studio 3 complete with sound dampening audio panels on the wall. These robotic bookscanning machines are used to photograph books at a very fast rate and then turn them into digital copies. 

On the left, you can see the original space before the renovation. On the right, you can see Project Room 3 completed. This vacuum copystand will be able to accommodate prints, maps, posters, etc up to 40″ x 60″ to photograph.

On the left is the area before renovation. On the right is the completed Project Room 4. It can be used as a color proofing area or double as a small studio area. The large door at the far end allows large objects to be moved from the loading dock into the studio to be photographed.

On the left, you can see the original warehouse space before renovation. On the right you can see Studio 2, complete with a brand new catwalk to photograph objects from above.

On the left, you can see the original warehouse space before renovation. On the right, you can see the completed cove wall in Studio 1 ready for photographic projects.

Let there be light!!!

We are entering the final weeks of construction and the lab is coming together beautifully!  The team has been working hard on all fronts.  The electricians have installed miles and miles of data wire as well as our new light fixtures!  The painters have finished painting the ceilings, walls, and the catwalk and ladder.  We now have new doors, ceiling grids and sound panels! The cove wall has been installed and has been taped.   Every day there is something new!

Electricians hang the much anticipated light fixtures for Studio 3 in the Imaging Lab. All of the light fixtures in the Imaging lab will be equipped with bulbs that maintain a true color quality and even light illumination.

Electricians bundle the 85,000 feet of data wire that run through the Imaging Lab. That’s 16 miles of cable!!!!!!

An electrician installs the transformers that will provide the electricity for the whole Imaging Lab.

The new light and cabinet was installed in the back of Project room 4 which will be used as a color proofing area.

Studio 3 ceiling was painted with a matte black paint called Dry Fall. The paint is sprayed onto the ceiling wet. Any drops of paint that don’t adhere, will fall towards the floor and dry into a dust by the time it hits the floor, thus becoming easy to sweep up.

The catwalk and ladder get a final coat of paint.

Steve Saunders, Project Superintendent, shows off the new front doors of the Imaging Lab.

Ceiling grids were installed in Project room 2 as well as all of the office areas.

Sound panels were installed in Studio 3. These panels will lessen the noise created from three bookscanning machines that will soon occupy this studio.

Once the cove wall was fully installed, all the seams needed to be taped and sealed – this included the seams behind the wall.

In order to attach the cove wall to the floor, two of the painters had to wiggle between the cove and the south wall of Studio 1.


Open Sesame!

This week was marked by the delivery of our 10 foot rollup doors!  These doors will provide access for large objects to enter the studio spaces.  In other news, the catwalk had its mesh sides installed.  The partition beam and motor were encased in sheetrock.  A few of the project rooms have gotten a fresh coat of paint.  All of the sprinkler heads in the Imaging Lab were replaced.  Ductwork and electrical continue at a steady pace.

The new rollup door between the hallway and the warehouse space has been installed. I got to try the manual release!

Carpenters on a scissor lift are installing sheetrock that will encase the steel beams which will support the partition wall between Studios 1 and 2.

In the foreground, the catwalk stands proudly with its new mesh sides. A taper stands on a scissor lift and tapes the sheetrock around the partition track. In the background, a tinknocker installs ductwork in Studio 1.

George and Steve discuss the insulation which will prevent condensation from the ducts.

Sprinkler heads get replaced with new ones.

Steve Saunders, Project Superintendent, tests the tensile strength of the easel peg holes.

Studio 3 gets a coat of grey paint.

Just hanging around…

This week the team has been hanging a variety of items around the Imaging Lab.  In anticipation of receiving our light fixtures, the electricians have hung the support chains from the ceiling in Studio 3.  The track for the partition wall has arrived and is currently being installed.  One opening for the last door installation has been raised in height to accommodate the new coiling doors. Duct work continues at a steady pace.

Chains hang from the ceiling of Studio 3 demonstrating where the light fixtures will be mounted.

The upper track of the partition wall has been attached to the recently installed steel beam. This track will allow the partition wall to open and close smoothly between Studio 1 and Studio 2.

Two carpenters frame the doorway that will lead from Studio 1 and Project Room 4 to the loading dock. The doorway was raised to 10 feet to accommodate the new coiling doors that will be installed in the Imaging Lab.

New ducts awaiting installation in Studio 2.

Moving along purrfectly…

The team has been very busy in the last few weeks.  Most of the walls have been closed with sheetrock.  They have been taped and sanded and will soon be ready to be painted.  Installation of the plywood backing of the cove wall in Studio 1 has completed.  However, the big excitement was the delivery and installation of the catwalk for Studio 2!

The bottom half of the west wall of Studio 2 has been taped and sanded. This is the wall where the easel will be located.

Walls in Studio 1 and 2 have been taped and sanded and are ready for painting.

The cove wall has been sheetrocked and the plywood has been installed. It is ready for the installation of the fiberglass cove pieces.

Iron workers unload pieces of the catwalk from the delivery truck on a very cold November morning. These pieces will be bolted and welded together from the ceiling in Studio 2 in the Imaging Lab.

Steel hoops are bolted to the ceiling and act as supports for the catwalk that will hang over Studio 2 in the Imaging Lab.

Iron workers place the steel supports for the base of the catwalk.

Iron workers place the final pieces of steel on the frame hoops for the catwalk.

Sometimes adjustments need to be made in the field. Here an iron worker is smoothing down the welds on the steel supports of the catwalk.

The catwalk frame has been hung along with half of the galvanized steel grating that will be used as the floor of the catwalk.

Iron workers use a chainfall to slowly raise the ladder into an upright position so that they can place it against the wall to weld it into place by the catwalk.

TADA! The ladder is in place!

The Coordination Group received a tour of the Imaging Lab including the newly installed catwalk in Studio 2. The Coordination Group has been instrumental in determining the layout of the Imaging Lab as well as space and equipment needs.

Beam me up!

The Imaging Lab was a flurry of activity this week.  The “big” news was the delivery of three 1300 pound steel ‘T’ beams that will be used as support for the partition wall between Studios 1 and 2.  We also received our door frames and they are being installed as I write this.  Insulation has been placed in east wall of Studio 1. Installation of plywood backing of the cove wall in Studio 1 has begun.  Electrical and duct work continue to progress.

Two iron workers raise the first 1300 pound steel beam into place where it will get welded to the existing beams in the ceiling. These new beams will add strength and stability to the new partition wall that is being added to the Imaging Lab. The folding partition wall will separate Studio 1 from Studio 2 but can be opened to create one large studio space.

The second of three 1300 pound steel beams is moved into place.

Iron workers slowly raise the last 1300 pound steel beam into place to weld it.

The third 1300 pound steel beam is carefully being put in place around an existing water pipe.

Carpenters are installing the metal double door frame between Studio 2 and the office area space.

Insulation has been placed inside the frame of the east wall of Studio 1.

Carpenters are up in a scissor lift installing fire retardant plywood in the area of the cove wall. They will install the plywood 19′ high- the total height of the cove.

Mark placed on the plywood stating that it has been safeguarded as fire retardant treated wood.

We rocked while Hurricane Sandy rolled!

While Hurricane Sandy hit the area hard on Monday and Tuesday, the job site was open and work continued on the Imaging Lab.  Durock was removed in Studio 1.  Plywood and sheetrock were installed on the easel wall in Studio 2.  Plywood blocking was put in place in preparation for the mounted arms that will hold display screens.  Floor leveling compound was poured to level out the uneven floors in Studio 3 and Project room 4.

The durock layer in Studio 1 has been removed so that the plane of the wall is even. The cove wall can now be installed and the wall will be given a new layer of sheetrock.

This is a closeup of the layers of durock. Durock, also known as cement board, is a mixture of crushed stone/gravel and Portland cement (the most common cement) poured between 2 pieces of polymer coated fiberglass mesh. It is very similar to sheetrock but is heavier due to the fact that it has cement in the middle instead of gypsum.

All of the previous doors and windows in the hallway that lead to the rooms that would be the Imaging Lab were sealed with sheetrock and taped.

The west wall of Studio 2 has two different planes. The top have of the wall was indented about an inch so strips of plywood were screwed to the wall to make the wall the same thickness as the lower half. The entire wall was then covered with plywood. This plywood will eventually be covered with sheetrock. In the future, large paintings will be hung from this wall and photographed. The plywood will help anchor the screws that will hold up the paintings.

Now that the easel wall in Studio 2 is covered in plywood, it gets a layer of sheetrock that will be painted white which will be used as a background when photographing objects on the easel.

Plywood blocking is used in the wall where a display screen is going to be placed in the central office area. This will allow the arm that will hold the display screen to be mounted to the wall.

Floor leveling compound has been poured over the quartz epoxy to level out the floor in Studio 3.

I see your duct and raise you a doorway

This week one doorway to the loading dock has been raised to 10 feet high, the same height as the doors to the Imaging Lab to accommodate the movement of large objects.  Insulation was installed on the newly erected ductwork.  Installation of copper heating pipes and ductwork continues.

This area of the hallway has been raised to 10 feet to accommodate large objects that will be transferred from the loading dock to the Imaging Lab for digitization.

Insulation has been added over the ductwork to keep air heated in the winter time and to reduce condensation from cool air in the summer time.

A pipefitter solders copper heating pipe together over the office area of the Imaging Lab.

Ductwork connection being placed in the wall between Studio 3 and the office area.

Pipes, conduits, ducts — Oh My!

Things are moving forward this week in the Imaging Lab.  Copper heating pipes were installed through the office space.  New conduit has been installed that will hold the data and electrical lines for all of the Imaging Lab. Installation of ductwork continues.

Here are some photos of the progress!

These newly installed copper pipes will not only heat the Imaging Lab but they will reheat the air to reduce humidity.

Ductwork connection over the office space in the Imaging Lab.

On the left, a pipefitter is installing copper pipe between Studio 3 and the office area of the Imaging Lab. On the right, an electrician is trying to set up the electrical wires for Studio 3 on a scissor lift 20 feet in the air.

New conduit that will soon hold data and electrical lines was attached to the ceiling in Studio 1 and Studio 2.

Sheet rock being installed on the wall between Studio 2 and Studio 3.


Steve Saunders, Job Site Supervisor, and Meg Bellinger, Director of YDC2, on a tour of the Imaging Lab.