To Image or Copy -The Compact Disc Digital Audio Dilemma

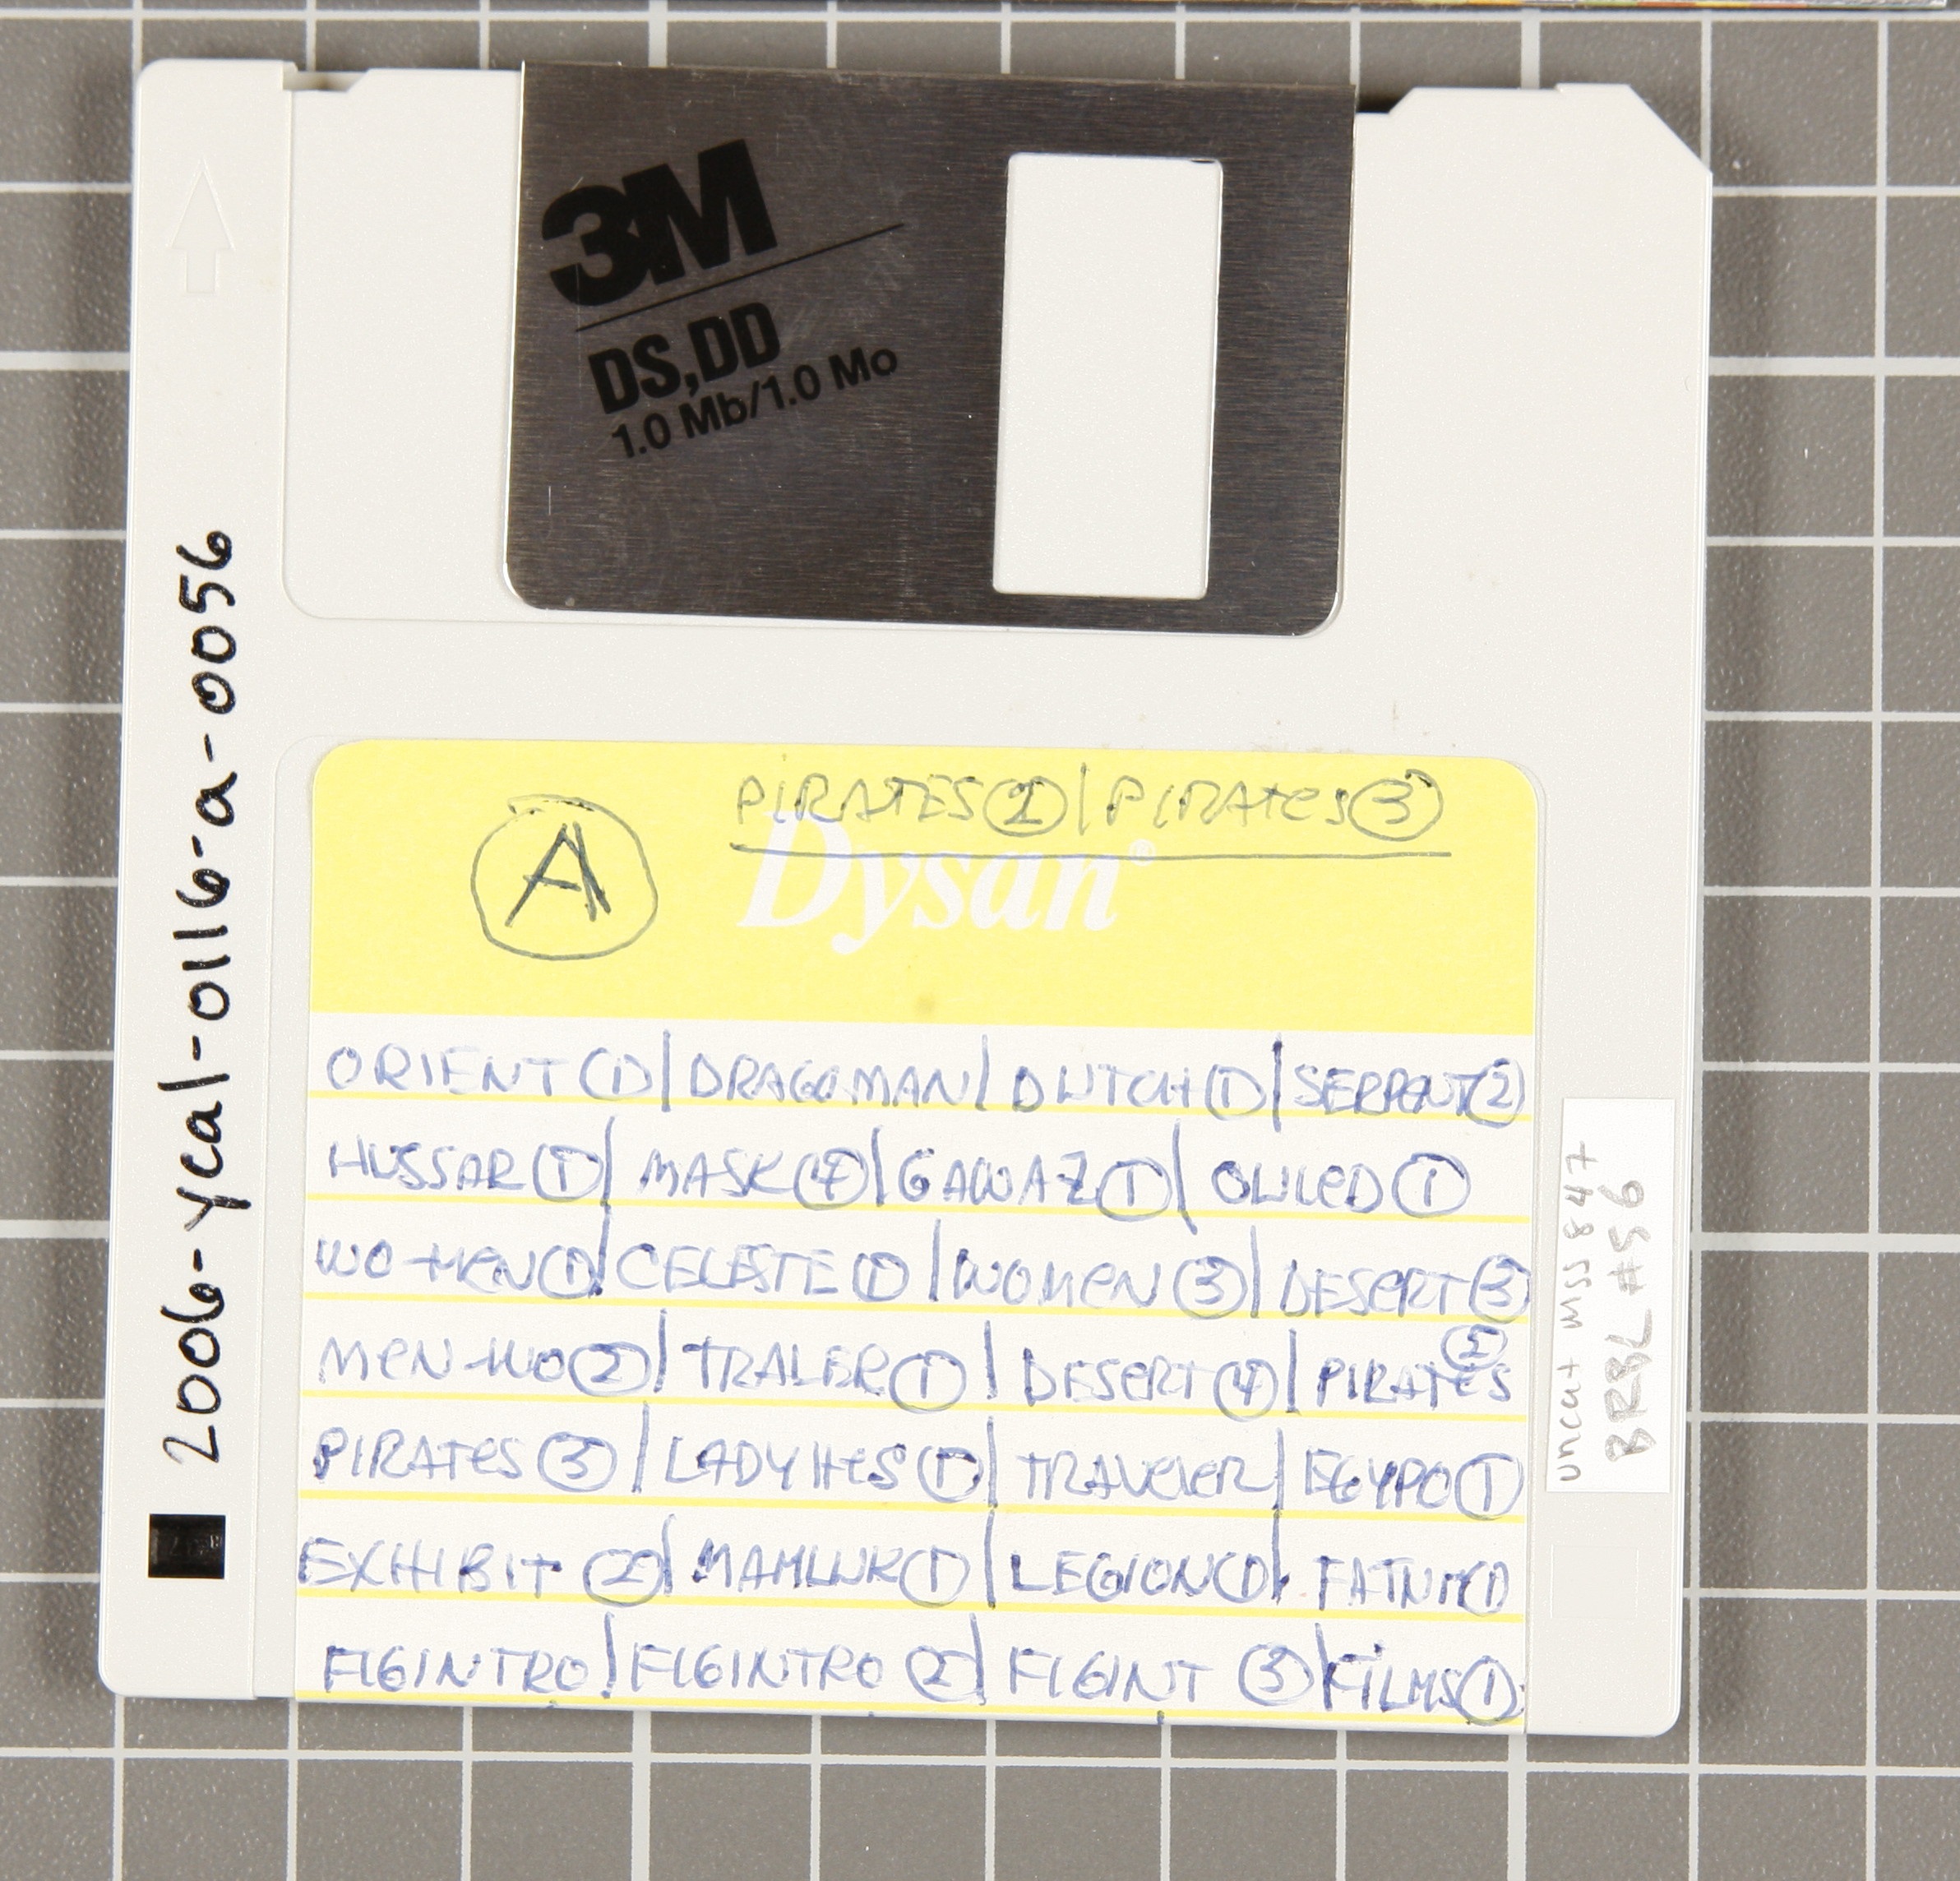
Anyone with a pre-MP3 music collection has seen this icon before.Compact Disc Digital Audio Icon

It’s possible you didn’t notice it, lightly printed in small text, hidden next to the band name or track listing, but it’s there. In looking through my personal music collection I was surprised to find it on nearly every album from the Velvet Underground to Britney Spears.

This icon identifies optical media as Compact Disc Digital Audio, or CD-DA, a format created specifically for storing digital audio. In 1987 Philips and Sony released IEC 60908, which outlined the technical details for a CD-DA. Most mass produced music in the ’90s was written to a CD-DA because this format allows for higher storage capacity, meaning more musical tracks can fit on a single disc.

Why does this matter to our born digital archives, and specifically for our born digital accessioning service?

Because manufacturers of CD-DAs exchanged more data per sector (i.e. more music on a disc) for a higher error rate than your standard CD-ROM. According to “An Introduction to Optical Media Preservation” by AVPreserve, standard commercial hardware is only 95% accurate at the track level. Meaning that up to 5% of content could be lost if we approached CD-DAs with the same disk imaging workflow used for other digital media.

Our original workflow for optical media required that the service creates an iso image using Forensic ToolKit. However given the high error rate on this type of disc, it’s imperative that we change our workflow for CD-DAs. Disk images are created by reading the data on the disc once, which would create an image including this high error rate. In order to avoid losing up to 5% of the relevant data, we’ve decided to change our workflow from creating a disk image to copying the audio files using a tool made specifically for working with CD-DAs. Following the suggested workflow proposed by AVPreserve, we’ve adopted the use of Exact Audio Copy (EAC), a software tool created specifically for extracting high quality audio tracks. The tool reads each sector of the disc multiple times to detect any errors. If an error is detected EAC continues to reread the disc 16 times and only considers the sector error-free if at least 8 of those 16 attempts retrieved the same data. If fewer than 8 reads match, EAC notifies the user and provides the time position of that error.

But how do we know for the sure if the disc in front of us is a CD-DA or a CD-ROM or a DVD? Although the icon discussed above is a strong indicator of a CD-DA, it isn’t always accurate. Some CDs are formatted as a CD-DA, but lack the printed icon. The tool IsoBuster allows us to review the properties of a disc and determine if it is a CD-DA.

Now that we’ve identified the correct tools for identifying and capturing files from CD-DAs, we need to consider which configurations will work best for our purposes. Here are a few of the areas we’re considering in testing our configurations for EAC. The majority of our research on configurations came from the EAC wiki provided by The Hydrogen Audio Knowledgebase, and testing in our lab.

Secure Mode:

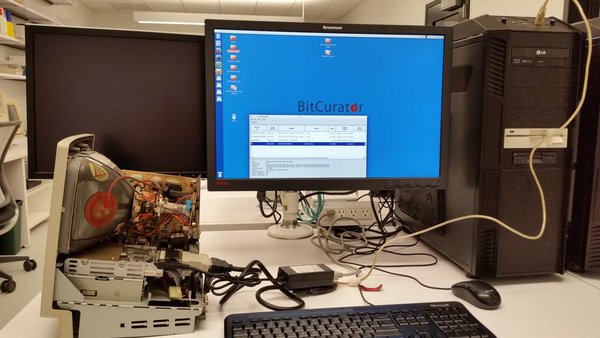
The main benefit of Exact Audio Copy for archives is the secure mode for copying audio media. This is the mode that ensures each disc is read a minimum of two times, and up to 16 times if an error is detected in the first two reads. Secure mode can be enabled through the drive options, but there are a few settings you need to select about your optical media drive. If you don’t know if your drive caches audio data or is capable of retrieving C2 error information, that’s okay! EAC is able to determine what features are available on your drive. By entering a disc into the drive and clicking the “Detect Read Features…” you can automatically apply the correct settings.

Screenshot of EAC detecting features of CD-ROM drive

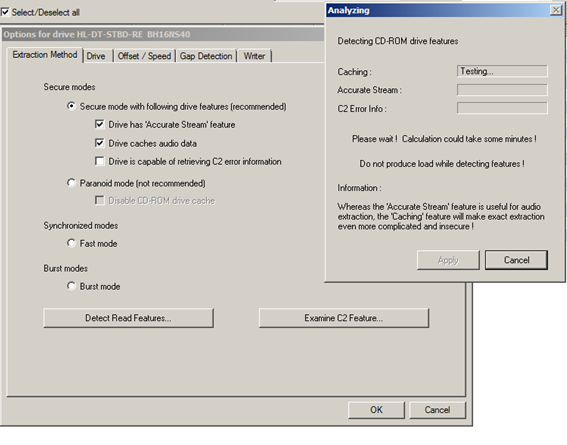
EAC detecting read features for secure mode of copying

Silent Blocks between Tracks:

Since the gaps are part of how the record creator worked with the material we have decided to preserve these silent blocks. In order to preserve these gaps, we detect them using the “Action” menu. You can confirm that these silent blocks were preserved, by reading the log file after you have completed copying the disc.

Copying Options

EAC has three options for copying media: Copy Selected Tracks Uncompressed, Copy Selected Track Compressed, and Copy Image and Cue Sheet. We decided not to use the compression options because it’s unclear from the tool’s documentation how much loss will be incurred through compression.

Copy Selected Tracks Uncompressed results in a WAV file for each selected track on the disc. This allows the archivist to make appraisal decisions and only capture selected tracks, rather than the entire disc. If a single track has an associated name in EAC, either embedded in the file by the creator, entered into EAC by the archivist, or identified from a connected database, that will be used as the file name. Otherwise the WAV files will be named 01 Track01.wav, 02 Track02.wav, etc. This option does not result in the creation of a cue sheet, but a log file can be created after copying, which contains all of the same information except the amount of silent time between tracks. Instead of recording these timestamps in the cue file, this option appends the silent block to the preceding track.

Both copying options allow the user to create a log file after the copying process has completed. This log file provides information on both the disc and the process used for copying. This includes the selected read mode, which settings were utilized, if silent blocks on the disc were deleted, the table of contents extracted from the CD, and other technical details of the copying process. This log file also provides information about any errors that may have occurred.

Sample log and cue files from test media

Sample log and cue files from test media

Copy Image and Cue Sheet results in a single WAV file for the entire disc and a .cue text file. That file will be named from the information entered in the metadata fields by the archivist following the convention of “CD Artist – CD Title”. If no information is listed, the file will be named the default of “Unknown Artist – Unknown Title.” Since the file naming convention for all other output from the digital accessioning service is to use the media number, this option would require the archivist to enter the media number in the Title field and delete the artist information from the filename. Since this option creates a single WAV file for the entire disc, embedded track file names are no longer associated with the WAV file, but instead are listed in the log file and cue sheet.

The .cue file provides the absolute position of of all track markers, including the times of silent gaps between tracks. Since the tracks are combined into a single WAV file during the copying process, it is important to preserve this track information. The cue file also indicates where and how long the gaps between tracks are. Each track listed include the track name, the composer and performer information as entered in the metadata fields, and the index where the track began. Each track listing includes the Index 00, indicating where the gap began, and Index 01, indicating where the track began. If Index 00 and Index 01 are listed at the same time, there was no gap before the track.

We decided to proceed with the Copy Image and Cue Sheet option.  This option results in a single WAV file, rather than a file for each track, which is the best practice for preservation and follows our practices for preservation copies of digitized audio. The audio file may be split into track files later, according to the information in the cue sheet.  We anticipate that the split track files will be used for access copies and possibly for archivists managing arrangement and description

Metadata Fields:

When working with material from a manuscript repository, the standard music metadata schema provided in EAC is rarely applicable. EAC provides options for “Artist”, “Performer”, “Composer”, and “Genre”, most of which will not usable in our context. However, this information is preserved in the log file, so it may be worthwhile to consider crosswalking our existing metadata schema to this music based schema.

For the moment, this metadata crosswalking is only an idea. The service is only working with the “CD Title” and “CD Artist” fields in EAC, as these fields appear as the filename for the log file. If left blank the log file will be named “Unknown Artist – Unknown Title.log”. For the service we are listing the CD Title as the media number and deleting “Unknown Artist” from the log filename post-creation. This is consistent with the file naming convention for log files created through other capture processes used by the service.

Hybrid CDs: The Next Problem

We’ve recently become aware of a new potential problem with optical media: hybrid CDs. These discs contain both digital audio and other data types and are formatted partially as a digital audio disc and partially as a data disc. One commercial instance of this might be a CD-DA that also contains a bonus music video. The service has not yet come across this type of hybrid disc in our collections, but we’re currently researching how to address it so we’ll be ready.

A Rose by Any Other Naming Convention


In working on the Digital Accessioning Service workflow, we approached an interesting question: How do you label the physical media?  A seemingly simple issue, but it becomes more complicated when you consider the range of media types and the risks related to applying labels directly to media. The service requires participating units to label media prior to submission for accessioning both to confirm that we are associating the content with the correct description and to ensure that the physical media can be linked back to the content in the future.  It’s important that these labels be as permanent as the life of the media.  

Although the service requires that all media be labeled prior to submission, we do not prescribe a specific method for labelling.  The final decision on how to apply labels is left to the special collection unit that owns the media.  We tested the following labeling methods in order to provide guidance on how units may label media in way that ensures permanence and minimizes risk of damaging the media.

The labeling question is two fold – how do we apply the label and what should the naming convention be?  Each media piece requires a unique identifier, preferably on the media itself, rather than on a case or other container.  The service uses this unique identifier to confirm metadata prior to imaging.  The identifier is also used as the filename for the disk image and related photographs.  


First Question: What is the best naming convention?

First idea: Accession Number + Sequential Number (AccessionNumber-001, AccessionNumber-002, etc)

This plan would rely on existing accession numbers.  In this case half of the work is done for us since many disks have already been assigned an accession number when the larger collection was accessioned.  Using this number for labeling disks also applies semantic meaning to the label.  A disk with an accession number based label could quickly be connected to the larger accession record.  An accession number identifier also allows for more flexibility between units, which may use different accession numbering techniques.

One disadvantage to accession number labeling is that legacy naming conventions have already been written on some processed materials, some of which include a legacy accession number+sequential number convention.  If there are multiple identifiers on a single disk (both legacy naming conventions, and labels assigned by the record creator) there is a risk that the service will use the incorrect label information.  

Another potential drawback to this naming convention is that accession numbers are unique to a given collecting library or museum, but not necessarily unique across all YUL/M collections. Since we accept media from a number of libraries and museums there is no guarantee that the existing accession number will be unique to the service.  Ideally, all identifiers used by the service would be unique to avoid a potential mix-up of material from two different repositories.

Second idea: Barcodes

Barcodes have the advantage that most units already own a barcode scanner and those that don’t can easily purchase one that connects through a standard USB port. The barcode is unique and would remove the risk of someone incorrectly entering a unique ID as it goes through the service.  Any time a long number is rekeyed multiple times there is the risk of mistakes.  The barcode is also small enough that there is little risk of covering existing label information.  The only exception is very small flash drives or memory cards, which would already require external housing for labeling purposes.  Another advantage is that barcodes would obviously answer the question: “Which of these numbers is the correct one to enter?”  As media has been collected for over twenty years here at Yale University Libraries and Museums, the naming conventions have changed and legacy naming conventions still linger on older media.  A barcode workflow would remove the risk of mistakenly entering a legacy identifier.

One major disadvantage of the barcode is that it has no semantic meaning, and is instead a completely random number. Another disadvantage is that our system for descriptive records (ArchivesSpace) already has a field titled “barcode” that refers to the barcoding system applied to containers for managing storage locations of physical items.  The final drawback to applying barcodes is that it requires an adhesive label, which could fall off the media and potentially damage the media and the drive used for reading the media.


Decision Time: Accession Number + Sequential Number Wins!

Ultimately we decided that the semantic value and human readability of the accession number label outweighed the ease of scanning a barcode.  The service will most likely be copying the identifier directly from a metadata spreadsheet, which minimizes the risk of entering an incorrect identifier.


Second Question: How do we apply our decided-upon naming convention to the media?

First idea: Archival adhesive labels

This plan would require the archivist to write the naming information on an archival label (often used to label folders) and apply it directly to the physical media.  The largest drawback of adhesive labels is their fixed size.  It is unlikely that we would be able to find room for this type of label on a 3.5 inch floppy disk without covering existing label information written by the creator or other archivists.  This is especially problematic if the media may be displayed in an exhibit in the future. Another issue with this kind of label is the risk that it could fall off the media, requiring an archivist to re-image the disk to determine which collection it belongs to.  It’s also possible for the label to fall off while the disk is in use, potentially damaging the disk and the drive used to read it.

Second idea: Pencil

This plan would require the archivist to write the naming information directly on the media in pencil. Most of our plans for labelling require permanent markings on the media, which could be problematic for exhibiting material or if the naming convention were to change over time (or if someone makes a mistake in the original labeling process). Marking the media with pencils would remove the risk of making a mistake permanent on special collection material. However the impermanence of pencils is as much of a drawback as an advantage. Pencil markings smudge and can become illegible, which could require re-imaging to determine the contents of the media. Pencils also create dust, which could make its way through the plastic casing and damage the internal disk as well as the drive mechanism used to read the media.  

Bentley Historical Library (BHL) provides guidance on the risks related to labeling in their IMLS funded report on Removable Media and the Use of Digital Forensics. They recommend against “writing on floppy disks with pencils or ballpoint pens, touching the tape, or affixing labels” because of the internal disk’s fragility.

Third idea: Standard Permanent Marker

Photograph of 3.5 Inch Floppy Disk with fully written label

Some record creators use every inch of their labels, leaving little room for archivists to apply their own naming conventions


This plan would require the archivist to write the naming information directly on the media with a permanent marker.  The standard Sharpie marker is already in use for labeling

optical media in many units, so this would be an easy transition.  However, a black marker isn’t visible on all media types and may require the archivist to find space on an already packed label.


Fourth idea: Silver/Black Paint Pen

This plan would require the archivist to write the naming information directly on the media with an oil-based paint pen.  This would require both a silver and a black pen so that markings would be visible on media of all colors.  These markings would be permanent and once dried would not risk smudging.  The main drawback to this plan would be regarding optical media.  The BHL report recommends against writing on optical media with solvent based markers because they “can penetrate the hard layer and deform, discolor or corrode the disc, causing permanent reading problems for the laser.”  


Decision Time: Paint Marker Wins! (with a caveat)

Ultimately we decided there should be slightly different rules for different media.  Solvent based markers are the best solution for media in hard plastic casings (such as floppy disks and hard drives), but could damage optical media.  The Council on Library and Information Resources recommends felt-tip water-based markers for optical media, because these are the least likely to have a damaging chemical reaction.  We decided to use a permanent marker and only apply labels to the inner circle which does not contain data, which will limit the risk of corroding the media.


In Conclusion

The Digital Accessioning Service is making recommendations for how a unit may apply labels to their media, however the final decision is left to the unit. We hope that standardized naming conventions and label applications will aid in quality assurance and long term intellectual control of physical media.  By using the naming convention as a label for physical media and the filenames for disk images, packaged transferred files, and associated photographs of media, we can ensure that the digital files will be associated with the media for the long term.


The Final Label

Labels written on test media

CD with label written in Sharpie on inner circle

3.5 and 5.25 inch floppy disks with labels written in oil paint pens

Introducing the Digital Accessioning Service

Anyone who has worked with a computer for the past decade or longer probably has a few files saved on floppy disks, zip disks, CDs, and other assorted storage devices. Modern media like CDs and flash drives may still be accessible, but older disks are often unreadable by modern machines, left to languish in attics and filing cabinets. 

The libraries and museums at Yale University are no different. Much of the digital media we have acquired over the last twenty years is trapped on legacy media requiring special hardware and software to access it. Despite the growing presence of born-digital archival material in Yale’s special collections, until now we have not created a system-wide approach to processing these holdings. Repositories with adequate funding and expertise are already providing access to born-digital, but many of these activities have been ad-hoc and the procedures differ based on available technology and expertise. Some repositories have postponed acquiring and processing born-digital media, deciding to wait for the libraries to create a holistic approach.

In January 2015 the Born Digital Working Group was formed to address this need and determine how the different libraries and museums can pool resources and expertise to find a path forward for born-digital archival materials. Our vision is to provide the same level of stewardship for born-digital holdings as is devoted to our physical collections. One of the priority goals is to establish a centralized Digital Accessioning Service for Yale special collections to capture files in a way that maintains their archival integrity and package them for ingest into the Digital Preservation System. This service is still in the beginning stages as we test software and hardware, draft documentation, and ensure that we are ready to begin accessioning archival material. The service will be housed in our new Di Bonaventura Family Digital Archaeology and Preservation Lab, allowing us to provide accessioning services for born-digital media from across Yale University Libraries and Museums.View of the Digital Archaeology and Preservation Lab

Last April the Beinecke’s Technical Services department and the Preservation Department moved to a new facility that includes the shared Digital Archaeology and Preservation Lab. The space currently hosts disk imaging for special collections as well as disk imaging for the general collections managed by Euan Cochrane, Yale’s Digital Preservation Manager. The new lab has more room for collaborations and sharing expertise with staff and visitors. There is additional space and shelving for storage of supplies, tools, and media awaiting accessioning. The lab houses two workstations devoted to disk imaging for special collections, two workstations devoted to imaging disks from the general collection and additional write blockers.

The digital preservation team uses the lab to house legacy computers that can be used to view files in their original environment, interact with digital content that requires original hardware, and test and validate digital preservation approaches such as emulation and migration against the original content executing on contemporaneous legacy hardware. The Digital Preservation team is also creating disk images of the legacy computers which will be attached to emulated versions of the original hardware environments. Using images of the original hard drives with the emulated hardware will help to enable accurate validation of emulated hardware by removing one source of difference between the two environments. Mac Classic II attached to digital forensic station for disk imaging

We use BitCurator, Forensic Toolkit (FTK), and Kryoflux to create disk images in the lab. Each offers different advantages for working with different media types. The extra room also means we can avoid the pesky traffic jams that came up in our former lab space in Sterling Memorial Library.

Now that we have the technology in place, we are working on documentation. That includes reference guides for write blockers, how-to manuals for disk imaging, and workflows to explain how media will make their way from collections through the accessioning process. All of this will inform the service, led by myself as the Digital Accessioning Archivist with the guidance of the Beinecke’s Digital Archivist and the Born Digital Working Group. I’ll be the new go-to person for born-digital accessioning here at Yale University’s Libraries and Museums. For the next month I’ll be focused on getting all our docs in a row so that we can begin accessioning digital media from archival collections across campus. I will also be visiting the various special collections and archives across campus to familiarize myself with the collections and processes in place, so we can make born-digital accessioning a seamless part of archival processing here at Yale. As the born-digital program continues to develop, we hope to invite the Yale community into the lab to learn more about our work with digital preservation, emulation tools, and disk imaging.

The Pitfalls of Working with Born Digital Records: Two Presentations

Don Mennerich, a digital archivist in the Manuscripts Division at The New York Public Library, and I presented at the 2013 code4lib conference in Chicago, Illinois. Our presentation specifically focused on the complications of working with legacy born-digital records in special collections, and the occasionally extraordinary steps we undertake to preserve them or make them accessible. Our slides are available below or on Google Docs.

[gview file=”http://matienzo.org/storage/2013/2013Feb-code4lib-pitfall.pdf”]

Additionally, I presented a workshop on working with open source digital forensics tools to the University of Michigan student chapter of the Society of American Archivists last October. Nearly six months later, I have been able to get the slides and audio together in video form:

[kml_flashembed movie=”http://www.youtube.com/v/Q_LarkWDbF4″ width=”640″ height=”480″ wmode=”transparent”/]

 [originally posted by Mark A. Matienzo]

Digital Oral Histories, Transcripts, and User Interfaces

One of the most heavily used collections of born-digital records in Manuscripts & Archives is RU 1055, Oral histories documenting New Haven, Connecticut (http://hdl.handle.net/10079/fa/mssa.ru.1055). Since being acquired a few years ago, more than 50 different interviews have been used by a number of different researchers, the majority of those researchers Yale students. Manuscripts & Archives does not currently have an online access system to provide access to these born-digital records. All access is provided onsite. Use copy Audio CDs were created of the audio recordings and use copy pdf files were created of the transcriptions. Patrons are required to either access these use copies onsite using computers in the reading room, or purchase duplicate copies to be sent to them. While this is not the most robust system, the collection is used relatively heavily. Perhaps the usage would increase if they files were available for access other the Internet, particular users from farther afield.

One interesting aspect of research use of this collection is that the majority of patrons only utilize the text transcriptions and never listen to the audio interviews that the transcriptions were created from. Only a dozen audio recordings have been accessed in the last two years. Oral histories are not an area of my research focus. However, it would seem that much is lost to the researcher if they chose to rely entirely on the text transcriptions rather than the original recordings. There is no nuance at all to the text. A cursory Internet search results indicates that there is a professional debate about this subject (see: http://www.oralhistory.org/wiki/index.php/The_Debate_Over_Transcription for example). A unit inside Manuscripts & Archives, the Fortunoff Archive of Holocaust Testimonies (http://www.library.yale.edu/testimonies/) purposefully does not create word-for-word transcriptions, but instead creates in-depth finding aids describing the content of the video recordings in an effort to emphasize the importance of the videos themselves. I wonder what other organizations are doing. This issue will have great relevance as we continue to develop an online access system for born-digital and digitized collections. For oral and video histories, do we want a simultaneous, or side-by-side view of the audio or video and transcription? Or does this view too much emphasize the importance of the text? I don’t know the answer myself and am concerned that those who do have informed opinions may not participate in the development of the access systems. [originally posted by Kevin Glick]

3D-printed enclosures for the KryoFlux boards

I was recently asked to install two new KryoFlux floppy disk controller boards, replacing an older revision KryoFlux and an even older Catweasel controller board. The awkward thing about the KryoFlux is that unlike the Catweasel, it does not sit inside the computer, but on the outside, so we have the funny setup of a floppy disk ribbon cable coming out of a hole in the back of the computer into the KryoFlux and then a normal USB cable connecting it back to the computer.

Since this is just a bare electronic board sitting on the table, we thought it would be a good idea to find some way of protecting it. And then I thought about the 3D printers that Yale just got as part of the new Center for Engineering, Innovation, and Design! I took a KryoFlux, made a bunch of measurements, and designed an enclosure on my computer. The next day, I brought in a prototype, made some adjustments to my design, printed another enclosure, and voilà!

We really do live in the future! And in the spirit of the 3D-printing community, I have uploaded all of the enclosure’s files: http://www.thingiverse.com/thing:64058 [originally posted by Aschi Haggenmiller]

Imaging Jaz Disks

I had some fun on Friday morning. It was my first attempt at creating a forensic disk image of the 2 GB Jaz disks (see: http://en.wikipedia.org/wiki/Jaz_drive). We have had these disks in the University Archives for several years, but haven’t had the capability to deal with them. Our student is currently working through our backlog of previous accessions of digital records and he came upon these Jaz disks. He had never seen or even heard of a Jaz disk. I tried to explain that they were from the manufacturer of Zip disks. This only proved to show my age, since he had never heard of these either; before his time.

The great difficulty with Jaz drives is that they were never all that popular in the consumer market and used a more expensive connection to the computer, SCSI 50 pin HD that was more expensive. This means that the connection to one of our lab computers can be difficult. At first I was unsure how we might connect from the 50 pin HD SCSI 2 on the Jaz drive (which I had managed to pick up when cleaning out an office for a retired administrator years ago) to the forensic computer workstation. I realized that our Tableau T3458 forensic bridge has a SCSI 68 pin HD SCSI 3 input. A quick search on the Internet revealed a $4 connector. It came in the mail last week and I pulled it out on Friday and made my first attempt to connect and image. With just a little bit of manipulation, it connected properly. The disk was formatted HFS on a Mac, so I was not able to mount the drive and Windows assumed it need to be formatted. However, I was able to use FTK Imager to create a raw image of the disk that I can open in FTK Imager or FTK. [originally posted by Kevin Glick]

Jaz drive with disk

Busy day in the forensics lab

We had a little bit of a traffic jam in the digital records forensics lab today as our new student Michael continued with his second day accessioning DVDs and Michael Lotstein gave some assistance to Suzi Noruschat while she was imaging her second small batch of DVDs. Kevin Glick, not pictured, working in the next cubicle on an accession that a patron has requested. <http://flic.kr/p/dPANLh>. [originally posted by Kevin Glick]

Busy Friday Afternoon in the Forensic Lab